Tutorial for an Idle game with Svelte (Part1)
June 22, 2019Making a Derivative Idle clone with Svelte
This is the first part of a multi part tutorial on making a game with Svelte1. (If you have not read it already, I made an introduction to Svelte you can find right below).
- introduction to Svelte
- part1: Start of the tutorial: making a Derivative Idle clone with Svelte
- part2: Going further with Svelte using components and props
- part3: Adding upgrades to the game
Tutorial
Let’s start the Derivative Clicker2 tutorial :) I’ll try to introduce concept as they come but you are expected to already know a bit of HTML, CSS and some programming concepts like variables, functions, loop and recursion.
For the following tutorial I’ll use the Svelte REPL3 but you can also follow instructions on the Svelte Getting Started4 page to set yourself up with your favorite editor.
Disclaimer
A little word of warning, it’s my first Svelte project so I may do things that are not optimal.
Also I will write some invalid HTML (invalid as in not W3C compliant) to not have to use CSS until the very end of the tutorial because it’s not the focus of this project. I will take care of pointing out when I take those shortcuts.
And also my English is far from perfect so hit me up with a message at contact AT julienrouse.com when you see an error so I can correct it and try to learn from my mistake to not do it again!
Introduction to the game and scope of the tutorial
What is Derivative Clicker
Before trying to create a copy of a game, lets talk a bit about what is the essence of this particular game. Derivative Clicker is an idle game. The idle genre resolve around making a number go big, usually by buying things that generate some form of currency. Then with that currency you can buy more stuff that generate more currency. There is usually no end game, just the pleasure to see your number grow bigger and bigger (until the browser can’t display your number because it’s too big :) ). Sometimes the game continue to generate currency even when you are not online but not always (not in this case).
Here you start with no cash and when you click on a button you gain some cash. Then after clicking a few times, with your hard earned cash you can buy something (I’ll call it “building” in the rest of the tutorial) that will generate a little bit of cash every tick. There is a tick every 1000ms (1 second) but as you progress, ticks can go faster, accelerating production. Then as you go further into the game, you can buy more buildings that generate either more cash or more buildings. (Like Russian dolls, there is always an extra layer).
You can also buy upgrades for your buildings that will make then more efficient, less costly or upgrades that will simulate clicks. (And some games have more elaborate ways of upgrading the game).
Also because the cost of buildings will grow exponentially but the growth of cash production will be less than exponential, at some point we will hit a time wall where we can’t buy new buildings before a long time. That is where reset comes in. The reset (or prestige) mechanic allow you to reset the game entirely from the start. But why would you do that? Because resetting gives you some form of bonus that helps you progress further into the game. Some elaborate games features more than one prestige layer. For our case, prestige gives us prestige currency that gives a percentage bonus to our building production. How many prestige currency you get depends on how big your numbers are at the time you reset. The prestige currency is also used to buy some powerful upgrades (for example unlocking new buildings) that allow to progress further. So you have to balance keeping the prestige currency for it’s production boost or spending it to gain other bonuses.
What we will aim for
- Create buildings that generate cash
- Create buildings that generate other currencies
- Create buildings that generate other buildings
- Have some upgrades
- Have some form of prestige mechanic
- Have some form of statistics for the game
- Use Svelte :) And discover its many features
Also note that you can peak at the source code of the game (itself forked from here). For this tutorial we won’t follow this code, but create a game similar to it from scratch.
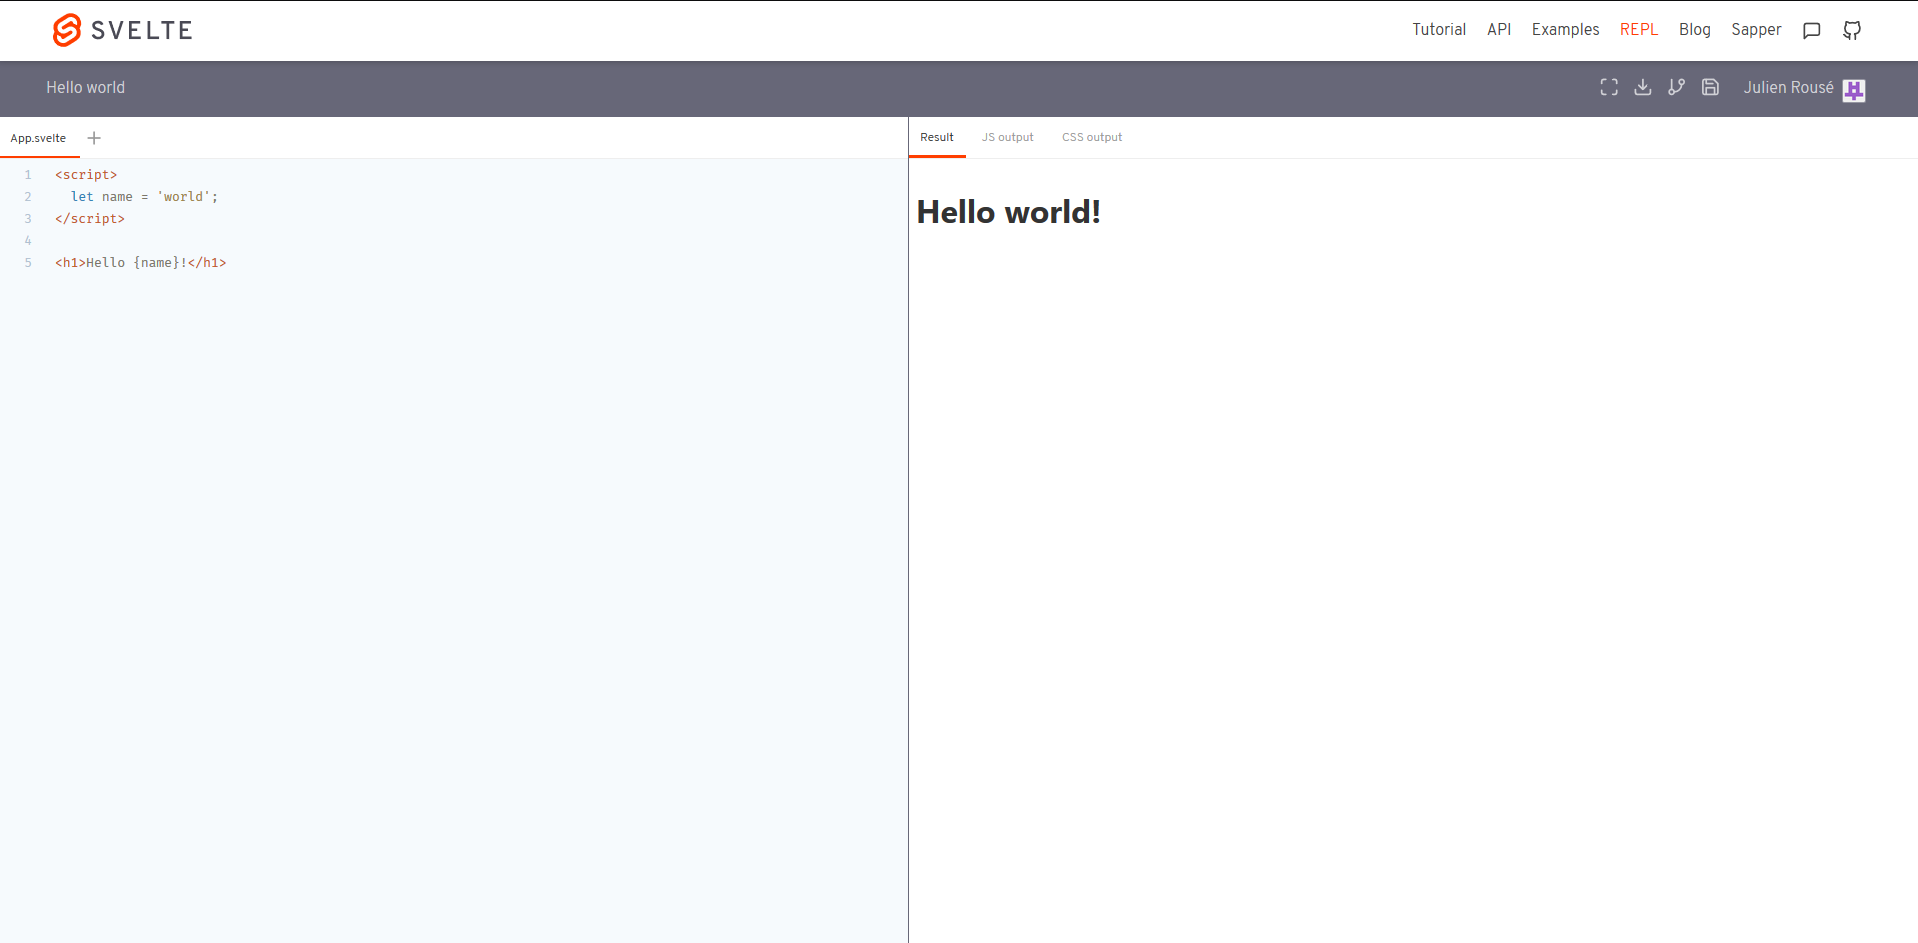
Hello World
The first line <!-- App.svelte --> is to indicate the name of the file, here App.svelte and it’s just for the tutorial. You do not need to include that line in your project, it’s for helping you follow along the tutorial.
|
|
File ending in .svelte are kind of like .html. They are mostly composed of HTML tags and components. (We will see after how to define our own components).
You can also define some logic inside <script></script> and reference it inside the html template. Above we declared a variable name and gave it the value "world". Then inside the template we reference it with the syntax {name} to inject its value.
If you use the REPL, you should see on the right side in the result pane a big bold Hello world!.
Creating the first building
If you recall the little introduction on idle games, building are things that you can buy and then they generate something every tick. (or every X tick, or twice per tick or whenever. Here we will start by producing money every tick.)
So for this first step we need to:
- keep track of cash (our primary currency)
- keep track of how many numbers of building we bought (cause the price of the building depends on the number of building, and how much cash is generated each tick is also dependent on how many buildings there are).
- create a function that will be used every tick (to gain currency)
Let’s keep track of cash in our game : let money = 20 and start with 20 units of it. And by modifying a bit the Hello World example, you can show the amount of money.
|
|
Next to represent a building, we will use a button. If you click on it, you buy it, deducting its price from your money.
We need two variables: one for the price and one for the number of building bought:
|
|
And then we can use those variable in the template with curly braces syntax {} we saw earlier:
|
|
So far so good :)
Now we need to actually do something when we click on the button.
Buying a building with event and event handler
We add an event handler to do something when you click on the button. In Svelte you can intercept any event with on: followed by the event name. Here the event is click so we use on:click={clickHandler}. clickHandler is a function that is called when a click is registered. For example:
|
|
Will trigger a JS alert each time the button is clicked.
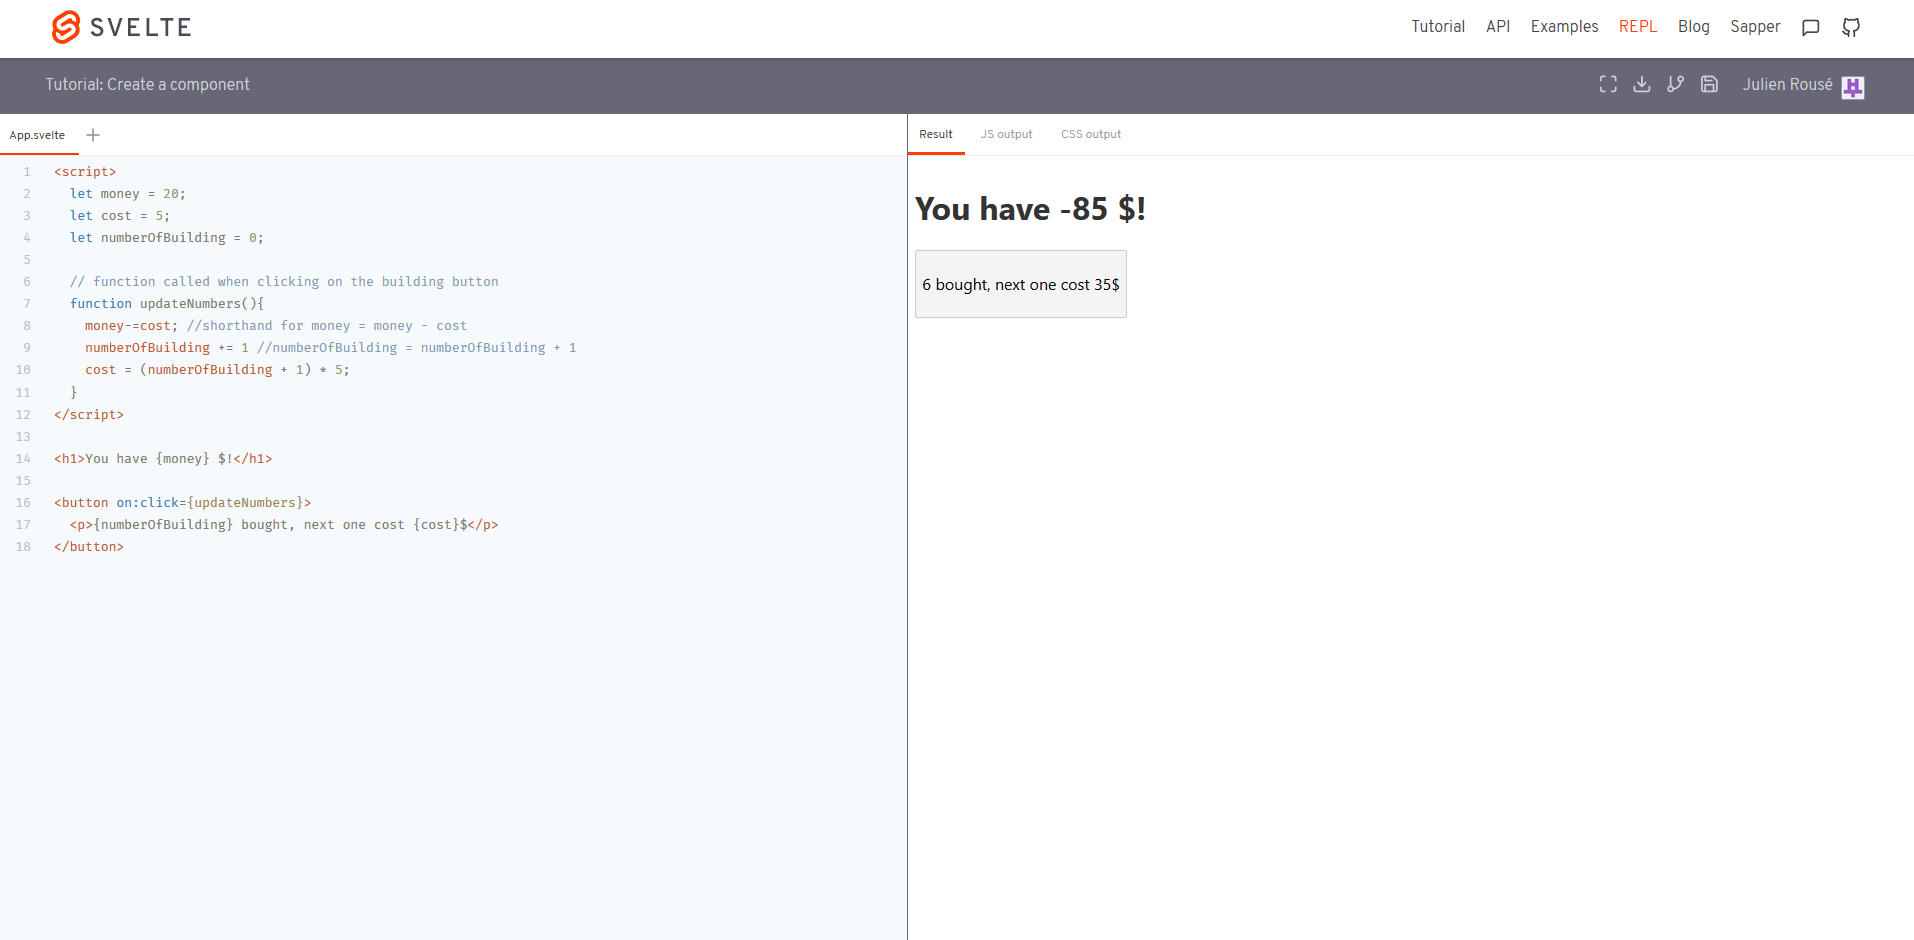
In our case we want to update our cash, the number of building and the cost of the next building. Let’s define a function updateNumbers that do exactly that. *Note that for now we use a linear growth function to calculate building cost, but usually idle games define a cost with exponential growth. We will change that later.
|
|
And the template for the button:
|
|
This seems to works :) But if you click more than three times on the button you will see that our money goes into negative value :( We need to restrict buying only when we have enough money.
Restrict buying building only when we have the money
What we want is to block the button when we have less money than the cost. We could write it that way:
|
|
But maybe we will need the boolean condition cost > money in other places as well, and it is better not to repeat many times the same logic (see DRY principle). If later on we need to change it, we’d have to find all the places we used it. (Spoiler alert: we will need to have that condition in more than one place, and we will also need to change it slightly later).
To solve that little problem, we are going to use reactive declarations5.
Refactoring using reactive declarations
Reactive declarations are a way to declare variable that depends on other variables. When the value of the variables they depend on change, their own value will be recomputed (they react to change hence the name).
Here we are going to write one such reactive declaration
|
|
And now we can use it in our button:
|
|
Below you can see the result, we can no longer click on the button when we can’t afford it.
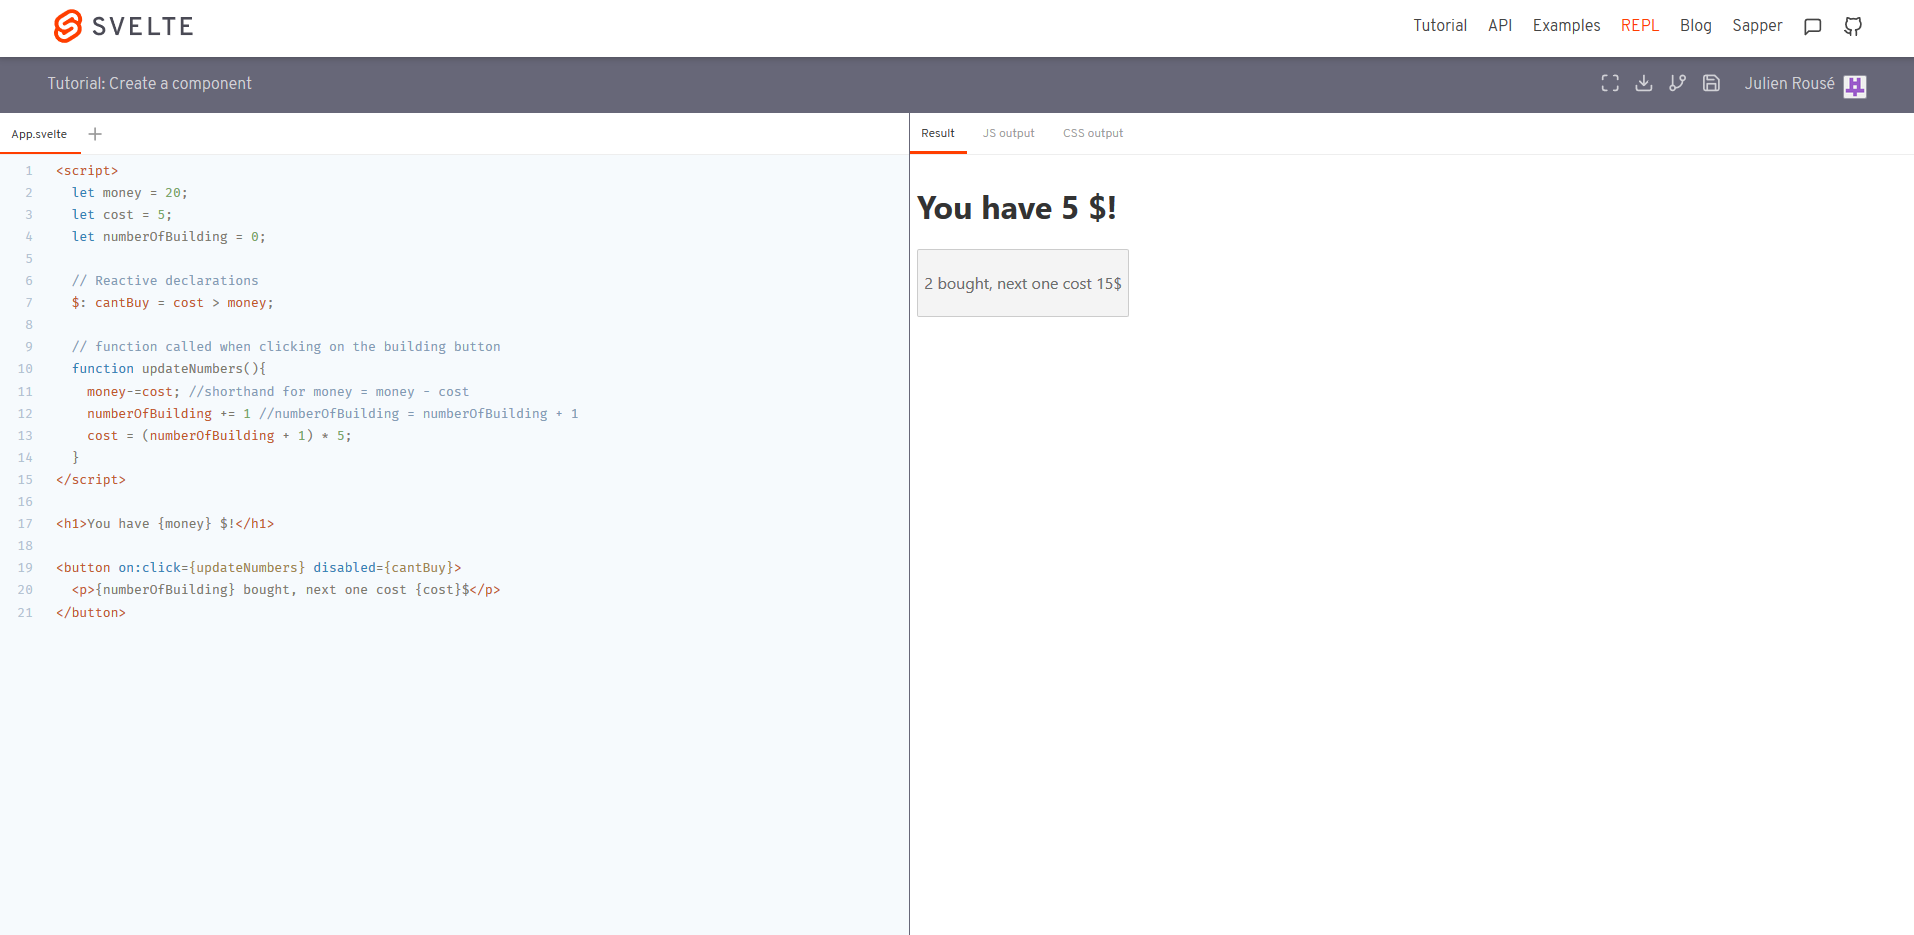
Another place we can use reactive declarations is with the cost variable. Remember that to update the cost we used cost = (numberOfBuilding + 1) * 5;. That too can be expressed as a reactive declaration.
|
|
We no longer need to update the cost here, reactive declaration does it for us when we update numberOfBuilding.
Mid tutorial recap
Let’s have a look at the full code until now and see how far we got.
|
|
We can buy buildings, can’t buy them when we don’t have the money. We need now to make them generate money!
Making buildings generates money
To do that, we need to trigger a function every X millisecond. In JS we can use setTimeout.
We will declare a tickSpeed variable that will be the X for the interval for setTimeout. Later on it will allow us to increase or decrease (mostly decrease) the value of tickSpeed to accelerate the game.
We will also declare a variable buildingProduction to represent how much money each building produce every tick.
And last we declare a new function updateMoney that will update the amount of money we have and trigger a timeOut to get called again after tickSpeed milliseconds.
|
|
And voilà! Now when you buy buildings, you should see the money going up each second!
Changes to the UI
For the first part of the tutorial we implemented all the feature we planned to but we could add some visual changes.
Add more stats
Now that we earn money each tick, wouldn’t that be nice to see how much we earn?
In the template we can just add <p>You gain {numberOfBuilding * buildingProduction}$ / tick.</p> to have more information:
|
|
NOTE: yes I inserted two <p> inside the <button. It is not the recommended way to make two lines of text one below the other in a button but for now it will do. (I checked a w3c validator6 and indeed it is not valid.)
Now you can test it, buy a couple buildings and you’ll see how much money you get each tick.
But by doing that, we introduced some redundancy. We used numberOfBuilding * buildingProduction which is already used in the function updateMoney. We can utilize a reactive declaration again to not repeat this operation in multiple place, and also replace it in the code in all the places it was used.
|
|
But when you replace everything that way, you get an error: can't access lexical declaration 'productionPerTick' before initialization. What is means it that we try to use productionPerTick (which rely on other variables) before Svelte has even initialized those variables.
To resolve this problem, we will have to use some lifecycle functions.
Introducing lifecycle functions: onMount
Svelte (like React and Angular) provides function that you can redefine to customize the comportment of the components.
Here we can use onMount to only call the function updateMoney (and consequently use productionPerTick) only once Svelte has been initialized. (Or rather, once Svelte has initialized the App component).
To be able to use onMount we need to import it first.
|
|
Once we do that the error disappear and the application works again. :)
For more information on onMount and other lifecycle functions, see the documentation and the onMount tutorial.
Adding some visual cues
And to finish this tutorial, let’s add some visual cues for the button.
We are going to change the background color for the button and change the mouse cursor depending on if we can buy it or not.
We can style elements directly into our .svelte files with the <style> tag. We are defining a default style for the <button> tag then a style for <button> that has the cantbuy class
|
|
Then we need to add this cantbuy class to the <button> only when we cannot buy it. Luckily we can re-use the reactive declaration cantBuy.
|
|
Here class:cantbuy={cantBuy} means Svelte will add the class cantbuy to the element only when the variable cantBuy is true. You can also write it with a ternary expression: class={cantBuy ? 'cantbuy' : ''}.
Conclusion
This close the first part of this tutorial.
Below is the full code:
|
|
You can play with the example in the Svelte REPL yourself.
You can also play the game we made so far here (hosted by Surge7).
To continue the tutorial, part2: Going further with Svelte using components and props :) We will build more than one building, create components to isolate our logic around buildings and continue to implement the game mechanics.